

Step-by-step for healthier gardens
You’ve watered consistently, added fertilizer on schedule, and still your garden looks more “meh” than magnificent. Sound familiar? The truth is, what’s happening beneath the surface matters just as much as what you do on top of it. Soil amendment, the practice of improving soil’s physical and chemical properties, is often the missing piece that transforms a struggling garden into a thriving ecosystem. This guide walks you through exactly why, when, and how to amend your soil the right way, so your leafy friends finally get the foundation they deserve.
Why and when you need to amend your soil
Here’s something most gardeners don’t fully appreciate: your soil is a living system. It’s not just dirt holding roots in place. It’s a community of microbes, minerals, air pockets, and organic matter all working together to feed your plants. When that system breaks down, no amount of watering or fertilizing will fully compensate.
This is where understanding the difference between amendments and fertilizers really matters. Soil amendments improve physical properties like structure, drainage, aeration, water retention, and nutrient holding capacity, which is distinct from fertilizers that primarily add nutrients. Think of it this way: fertilizer is like handing your plant a meal, while an amendment upgrades the entire kitchen.
So how do you know when your soil needs help? Watch for these signals:
- Water pools on the surface and drains slowly after rain
- Soil feels rock-hard when dry or sticky and dense when wet
- Plants repeatedly underperform despite proper care
- Visible crusting or cracking on the soil surface
- Yellowing leaves without a clear pest or disease cause
- Root vegetables come out twisted or stunted
These are your soil’s way of waving a flag. Compaction, poor drainage, low organic matter, or off-balance pH all create conditions where even the best fertilizer can’t do its job well.
“The goal of amending soil isn’t to feed your plants directly. It’s to create an environment where plants can feed themselves more effectively.”
Timing matters here too. The best seasons to amend are fall and early spring, ideally 4 to 6 weeks before planting. Fall amendment gives the material time to break down and integrate over winter. Spring amendment, done when soil is workable but not soggy, gives you a fresh start before the growing season.
One more thing worth repeating: more amendment is not always better. Over-amending can shift pH too far, create nutrient imbalances, or actually make drainage worse. A little patience and precision goes a long way toward building the kind of nurturing soil your garden truly needs.
Essential tools and materials for soil amendment
Before you start digging, it helps to gather the right gear and understand your options. The good news is that most of what you need is either already in your garage or easy to find at any garden center.
Basic tools you’ll want on hand:
- Garden fork or spade for turning soil
- Wheelbarrow for mixing and moving materials
- Gloves to protect your hands
- Soil test kit or lab test for accurate readings
- Measuring tape and a basic calculator for coverage estimates
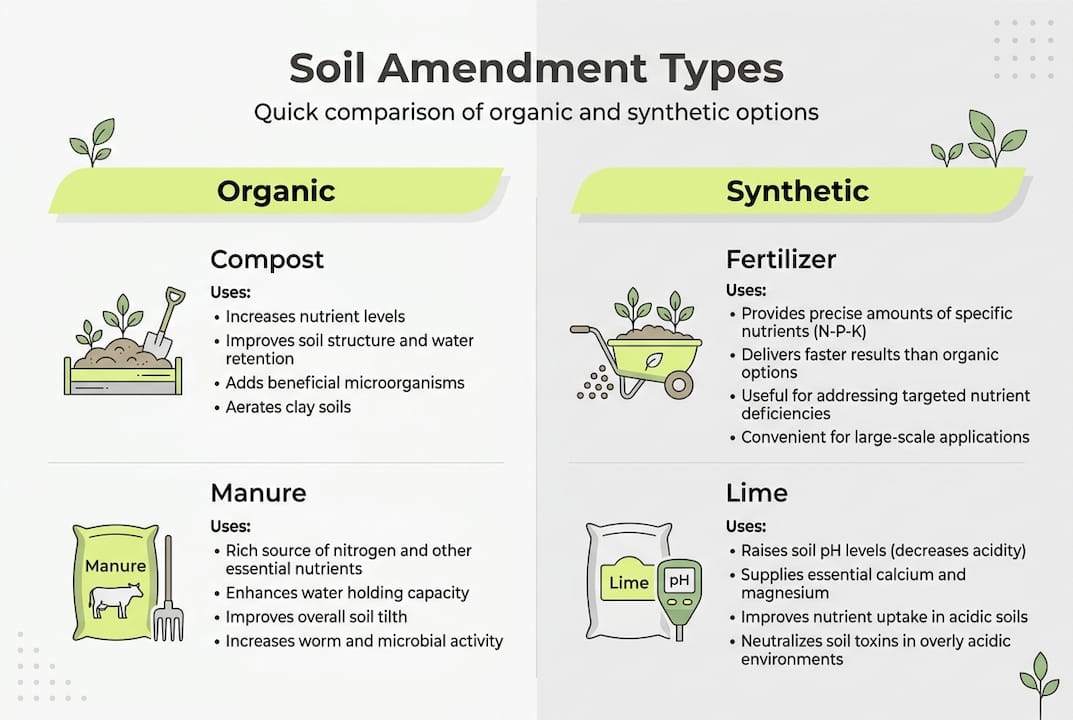
Now for the amendments themselves. There are two broad categories: organic and synthetic. Common organic amendments include compost, aged manure, worm castings, leaf mold, peat moss, and cover crops. They feed soil microbes, improve long-term soil health, and release nutrients slowly. Synthetic options like gypsum, perlite, or lime work faster for specific corrections but don’t build the living soil community that organic matter does.
Pro Tip: Always start with a soil test before buying a single bag of amendment. Guessing at what your soil needs is the most common way to waste money and time. A basic test kit tells you pH, nitrogen, phosphorus, and potassium levels, while a lab test gives you a fuller picture including texture and organic matter percentage.
Knowing what you’re working with changes everything. It’s the difference between nurturing your soil thoughtfully and just throwing things at the ground and hoping for the best.
Step-by-step process for amending your garden soil
With your tools and materials ready, here’s how to actually do the work. Follow these steps and you’ll avoid the most common pitfalls that trip up even experienced gardeners.
- Test your soil first. Start with a soil test to determine pH, nutrient levels, and texture before choosing an amendment. This step is non-negotiable if you want real results.
- Choose the right amendment based on what the test reveals. Low pH? You’ll want lime. Compacted clay? Compost and gypsum. Sandy soil that drains too fast? Organic matter is your answer.
- Calculate how much you need. A general rule: spread 2 to 6 inches of amendment over the soil surface, then incorporate it into the top 6 to 12 inches using a tiller, fork, or spade.
- Work the amendment into dry (not wet) soil. Spread evenly, then use your garden fork or tiller to mix it into the existing soil. Aim for full integration rather than just surface coverage.
- Water thoroughly after incorporating. This activates microbial activity and helps the amendment begin bonding with the existing soil structure.
- Wait and observe. Give it at least 2 to 4 weeks before planting when possible, especially with stronger materials like lime or raw manure.
Here’s a quick comparison to keep things clear:
| Step | Organic amendment | Synthetic amendment |
|---|---|---|
| Timing | Fall or spring | Usually spring, closer to planting |
| Application rate | 2 to 6 inches | Follow package label precisely |
| Incorporation depth | 6 to 12 inches | 6 inches typically |
| Wait time before planting | 2 to 4 weeks | 1 to 2 weeks |
| Watering after | Yes, thoroughly | Yes, thoroughly |
Pro Tip: Never work wet soil. When soil is saturated, tilling or digging compacts it further and destroys the air pockets plants need. Do a squeeze test: grab a handful of soil and squeeze it. If it crumbles apart easily, you’re good to go. If it stays in a ball or feels sticky, wait a day or two.
This whole process takes an afternoon, but the payoff in plant health lasts for an entire season or longer. It’s one of the most rewarding rituals a home gardener can build into their yearly routine.
Troubleshooting and common mistakes when amending soil
Even well-meaning gardeners run into trouble here. Knowing what can go wrong means you’ll catch issues early and course-correct before your plants pay the price.
Let’s start with the biggest one. Excess amendments can cause nutrient imbalances, salt buildup, or nitrogen tie-up from fresh wood chips or manure. More is not more. When in doubt, use less and test again the following season.
Here are other common mistakes to avoid:
- Adding sand to clay soil without enough volume. This is a well-known trap. Never add sand alone to clay because it creates a concrete-like texture rather than loosening the soil. If you’re using sand at all, it needs to make up more than 50% of the total volume, which is rarely practical for home gardens.
- Skipping pH correction timing. Adjusting pH requires planning: raise it with dolomitic limestone for acidic soil, lower it with elemental sulfur or aluminum sulfate for alkaline soil, and apply 2 to 3 months before planting. Rushing this step means your plants start the season in the wrong pH environment.
- Using raw or fresh organic materials. Fresh manure or uncomposted wood chips can tie up nitrogen in the soil as they break down, essentially stealing it from your plants temporarily. Always use aged or composted materials.
“Soil amendment mistakes usually come from impatience. The best gardens are built slowly, with small, consistent improvements rather than dramatic interventions.”
Watch for these warning signs post-amendment: surface crusting, water pooling in new spots, yellowing or drooping leaves, or a sulfur-like smell from the soil. Any of these can signal over-application or the wrong product for your soil type.
Pro Tip: Set a reminder to check soil moisture and plant response weekly for the first month after amending. Small issues, like slight yellowing or slow drainage, are easy to address early but can become real problems if ignored for weeks.
Troubling a soil that was already struggling takes time to fix, but you’ve already taken the most important step by paying attention.
Our take: The art and science of soil amendment that most overlook
Here’s something we’ve noticed across countless gardening conversations: most people either over-amend or they never amend at all. There’s not much middle ground. And the over-amendors are usually the most enthusiastic gardeners, which is kind of heartbreaking.
The chase for a quick fix, whether it’s a trendy new soil mix or adding a mountain of compost all at once, often does more harm than good. Real soil improvement is a slow build. It’s about layering small, consistent changes guided by what a soil test actually shows, not what an Instagram reel suggested.
What we think truly works is treating soil amendment as a seasonal ritual rather than a one-time rescue mission. Test in the fall. Amend thoughtfully. Observe through the growing season. Repeat. Over two or three years, you’ll build a living soil ecosystem that’s genuinely resilient, the kind where plants thrive with less intervention, not more.
The goal was never to force nutrients into the ground. It was always to build a system where your plants can access what they need, when they need it.
Ready to optimize your garden soil?
Amending your soil the right way sets the stage for everything else you do in the garden. When your soil’s structure, drainage, and biology are working together, your plants stop struggling and start thriving. But soil health is just one piece of the puzzle. Once your foundation is solid, giving your plants the cellular support they need to actually use those nutrients is the next level.
mitogrow’s biostimulant formulas are designed to work alongside a well-amended soil, boosting nutrient uptake by up to 50% and supporting your plants from the roots up. Explore garden soil solutions at mitogrow.com and find the right formula for your garden, whether you’re nurturing outdoor beds, indoor planters, or your favorite trees and shrubs.
Frequently asked questions
How do I know if my garden soil needs amendment?
Start with a soil test to check pH, nutrient levels, and texture, or look for physical signs like poor drainage, compacted surface, and stunted plant growth that don’t resolve with regular watering.
What is the best time of year to amend soil?
Fall or early spring are the ideal windows, with most experts recommending amending 1 to 2 times per year to gradually build soil health without over-correcting.
Are organic or synthetic amendments better for soil?
Organic amendments build long-term health by feeding soil microbes and increasing organic matter, while synthetic amendments deliver faster results for specific nutrient deficiencies but can degrade soil structure over time with repeated use.
How do I safely adjust soil pH?
Raise pH with dolomitic limestone for acidic soils or lower it with elemental sulfur or aluminum sulfate for alkaline soils, and always apply 2 to 3 months before planting so the chemistry has time to stabilize.